Sunday, March 31, 2013

Happy Easter!

Inserted ImageWe're celebrating Baby E's first Easter with both of our families today.

Here's hoping for some successful Easter Egg Hunts and some excited faces this Easter!

I know we can't wait for her to enjoy her Easter basket... even if she honestly won't remember it, I know it'll bring us some great memories!

Saturday, March 30, 2013

Free Audible Version of The Tale of Peter Rabbit

The Tale of Peter Rabbit | [Beatrix Potter]Here's a free audible version of The Tale of Peter Rabbit. All you have to do is click on the link and add it to your cart... following the steps as you go.

Perfect for a little Easter fun.

Friday, March 29, 2013

The Game of Keys

Every time I go to open up my front door, I can never tell which key is which. It's almost like a game. I have to feel out the numbers and the letters to know which one goes to the back door and which one goes to the front door. Sadly, the only key that I know doesn't go to this house is the key to my mama's house which has a rubber thing around it.

So, since I was tired of playing the game every time I came home. I decided to paint my keys.

First, I tried it with nail polish as seen here on A Bubbly Life; I saw them on several boards on Pinterest. Now, I didn't quite like the way the keys were looking with the nail polish, so I decided to use my acrylic paint to paint them. The acrylic paint gave it a little bit more of a vibrant look.

Here's the first with the nail polish:


Then with the acrylic paint:


Alrighty, now that I can actually tell which key goes to which door. Let me explain to you how I did it.

It's pretty much like the directions with the nail polish. I had to clean my keys first since when my husband takes my keys they come back dirty. I've asked several times how and never get a straight answer. Who knows. Anyways...

* I grabbed some dried wipes from one of Baby E's wipe containers and wet them to re-moisture them (It mysteriously showed up upstairs... I guess it's from her days of sleeping in the bassinet?)

* I then dried them off with a paper towel and grabbed a few of my paints.

* I found that one paint brush worked WAY better than the others, so I stuck with this one as I painted each.

* The worse part was the drying. Having to wait for each side to dry felt like FOREVER!

* Once both sides dried I added them to my key chain.


Now I just have to go out before I can use them again! Hopefully the Game of Keys is over... but there again who knows?


Thursday, March 28, 2013

I Woke Up To This....

Around 3 this morning I was woken up by a ridiculously LOUD truck, which is really unusual considering I've never been woken up by a vehicle before. My husbands jacked up crazy truck never even woke me up --- I'm guessing I was never fully asleep... who knows. Anyways, all of a sudden I here these crazy noises coming from downstairs and this is what I came down to....


Yup, that's a sofa. Now, I have to figure out how to add it to the space. I mean I can't say much cause apparently it was free, but it feels so LARGE in this space and I don't know what to do about it. 

Any suggestions on how I can make it work in this space? At least for the time being until we can actually buy our first sofa set. 


Instant Cup of Mac & Cheese ~ A Pinterest FAIL!

I found this recipe on Pinterest and decided that I would try it one night. I wasn't really in the mood to cook a whole pot of mac & cheese. Looking back though I wish I did because the mess this thing made was ridiculous! It was honestly a complete Pinterest fail and I mean FAIL!

Here's what it was supposed to look like:

The Family Kitchen
And here's mine:


Looked pretty easy right? Well, HA! I followed the directions closely but in the end it turned out to be a hot freaking mess. The stuff literally exploded in the microwave and was an absolute ridiculous mess to clean up. The cheese was stuck to the walls of the microwave, and even the plate, the cup, and everything in between. Not to mention, the liquid mess too. Anyways, it took awhile to clean up and even took several days to soak in water before being washed. I still had to scrub the cup after those several days. 

I'm pretty disappointed. I may try it again one day. I'll figure everything out when I decide to. However, right now I'd rather just do it the old fashioned way... it's a lot easier. 

Any suggestions on what I could have done wrong?


Baby E's Teething Storage

We have several wipes containers sitting around the house doing nothing. In reality they're just there, they kind of take up space since we're not using them at the moment. The majority of them were given to us at our baby shower (which we were very grateful for), but we found that Baby E HATES and I mean HATES a cold wipe. So, we bought a wipe warmer for her and that's where the majority of her wipes go.

With all of them just sitting around I felt that I could use them for something, anything. Then it dawned on me when I was grabbing one of Baby E's teething toys out of the fridge. All of them were just sitting there on the shelf and I felt like they were not clean. Every time I'd go to give one back to her, I'd wash it off. Not like I already didn't wash them off after every use before going back in the fridge, but I felt like just like anything else they were picking up the fridge odors.


So, I picked up one of the empty containers and washed it out. I also grabbed her toys and washed them again. As I waited for each to dry I decided to clean a small space in the fridge to place the container.

Once everything was dried, I placed her teething toys in the wipes container and placed it in it's place in the fridge.

Now, whenever we're looking for a toy we can just open up the container and grab one instead of always feeling like we have to re-wash before giving them to Baby E.

Here they are all snug in their little container in the refrigerator door. An easy access  for us when we need them and a place where they can stay clean versus picking up all the refrigerator odors and messes that sometimes occur in there.

Do you use your extra wipes containers or do you throw them away?


Wednesday, March 27, 2013

Bookshelf Additions Part 1


When we first started our daughters room we didn't have much. We only had a crib, a rocking chair, and a hand me down old dresser. So, we looked at some of our items that didn't have a home; we chose to take the bookcase that matched the crib and rocking chair.

I figured we could use the bookcase as a place to store her books, dolls, and toys. At first I had placed several Huggies wipes boxes in there. My goal was to recover them at a later date with polka dot fabric. Well, the more I thought about it the more i didn't like the idea. This was because I felt the boxes wouldn't hold up to wear and tear as well as they didn't seem big enough. So, back to the drawing board I went. After talking with my mama she suggested picking up some fabric bins. I had thought about them, but, also thought about a few baskets.

After weighing the options and looking at baskets we figured that the fabric bins would be our best option. So, we drove down to Target and picked up 4 bins in 2 different shades of pink. This actually helped pull out the lighter and darker colors of baby E's comforter.


Tuesday, March 26, 2013

Our Teething Favorites

Right now Baby E is teething like crazy. It hasn't been as rough as people have told us; but it's been hard. There again is parenting ever easy? For example, a lot of people kept telling us that she'll be staying up all night, crying all day, never eating, etc. Honestly, we're still sleeping at our normal times and some days we're fussy and others we're not. But hey, who isn't? I know I can be a grump some days.

Anyways, here are some of Baby E's favorite items while we enjoy this momentous time waiting for the arrival of her teeth :).


Baby Orajel Fast Teething Swabs Pain Relief, .06 fl ozMam Mini Cooler & Clip - Blister (2 Months +) Nuby IcyBite Hard/Soft Keys Teether

Sassy Firefly Water-Filled Teethers


Of course, she also enjoys chewing on her fingers and ours, as well as chewing on her bibs, and a washcloth. She's not to keen on the whole frozen washcloth, but she does like to chew on a wet one. So, she mainly gets that at bath time.  

What are your babies favorite teething items?


Monday, March 25, 2013

Not Your Traditional Trashcan


My husband and I never really bought our daughter a trashcan. We honestly couldn't fathom the idea of buying a nearly $30 trashcan and then buy the trash bag replacements for them. This was mostly because baby E HATES being wet. The moment she pees is the moment we have to change her. Yet, unless we smelled it or listened to her grunt we would never know she pooped. She's such an unusual child.

Anyways, last year my husband brought home boxes full of stuff from around his work. The place he works at throws a lot of stuff out and he'll sometimes bring it home. However, one day in the box full of stuff that he brought home was a little green bucket. Seriously, there was nothing wrong with it; they only threw it out because it had been used as a display... such a waste!

This little green bucket had been sitting in my husbands truck for some unknown reason... I have no clue why he put it there after he brought it home, maybe he was going to put his junk of a trunk in there or it was supposed to go into our storage unit. Who knows. Well, as we were both cleaning out our vehicles he pulled it out and it was moved inside to our kitchen floor... just sitting there.

So, while I was cleaning up the other day I stood there and stared at the bucket then of course walked away. Not to long after that I had to change baby E and as we walked to the kitchen to throw her diaper away... it clicked! I could use the little green bucket for her trash can. All I needed to do was clean it up a bit (I mean it had been sitting in my husbands truck... not so lovely) and then use the plastic bags that we constantly had left over from our shopping trips for her trash bags. Completely easy and I didn't have to pay a thing.


Pizza Pockets

Probably one of my most favorite foods from when I was a kid were pizza pockets. These were simple things that my mama would make with my brother and I, sometimes during lunch and then sometimes we had them for dinner.

Here's what you need:

* Pizza Sauce
* Pizza Cheese or Your Favorite Kind
* Butter
* Bread
* Any other fillers that you choose: pepperoni, onions, mushrooms, etc.
* Sandwich maker


To make these yummy sandwiches:

* Heat up your sandwich maker/grilled cheese maker

* Take your bread and slather on some butter on one side of each piece of bread (this will act as your non-stick)

* Once it has fully heated and the light has changed, place once slide of bread onto the surface.

* Next, take your pizza sauce, cheese, and any other toppings and place them onto the bread.


* After, you've put everything that you want onto your bread, take your other slice and place it on top. Butter side up.

* Close the top to your maker. It will take about 5 minutes and at times a little longer. Depends on the type of maker you have. Mine usually takes about 7 minutes.

* Watch it very closely though. If the
cheese is starting to spew out, it's done and if your bread is burnt it's definitely done. 

* Slice down the middle and enjoy.


A Just There Kind of Closet...


In my daughters room we have 2 closets: a gigantic walk-in and a just there kind of closet. It's her just there kind of closet, nothing fits... her clothes barely fit in there and it just seems like a waste of space. I had decided to put her bookshelf in there for the time being, however, I feel like her bookshelf needs to be out instead of hidden. So, now what do I do with this space? I'm lost...

I could probably put a hamper in there for her, but I feel that there needs to be something more. Ahhh, I need help... Any suggestions on what to do with this ridiculous area...


Here's what it looks like now:


Saturday, March 23, 2013

Make Your Own Holiday Day! 3-26-13

Tuesday, March 26, 2013 is Make Your Own Holiday Day. This is the perfect day to have your children/students be creative and write/draw their own Holiday Day. I wonder what kind of Holiday everyone will think of?

Friday, March 22, 2013

Cupcake Pizzas: A Pinterest Find!


Okay, so I probably spend WAY to much time on Pinterest. Anyways, I saw this pin for cupcake pizzas the other day and of course I pinned it... thinking one day I'll make it, just like all the other things I've pinned. Anyways, last night I decided to make them. It looked simple and easy plus I figured since my little rooter tooter was conked out I could actually try and make something instead of just throwing in whatever and eating whatever.

So here's what the cupcake pizzas are supposed to look like:

From All My Great Ideas Are Really from Pinterest
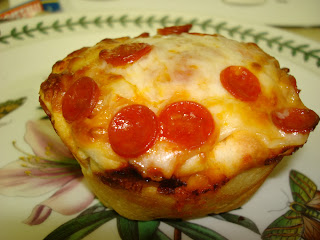
And here's mine:


Haha! So CLEARLY I nailed it!

Although mine look unsightly and maybe a tad bit burnt... they were still absolutely delicious!

So since I clearly nailed it, here's how you make them.


What you'll need:
  • Refrigerated pizza dough
  • Pizza Sauce
  • Cheese
  • Pepperonis
  • Muffin Tin
  • I used a butter spray to spray the tins
Now that you've gathered your ingredients OR at least I hope you did, here's how you put it together. It's pretty simple. 

Preheat the oven to 425 degrees. 

Grab your butter spray. For myself, instead of spraying the spray onto the cupcake pan, I grabbed a paper towel and sprayed it onto there. This gave me the ability to control the mess that I feel the spray makes every time. Plus, I was also able to control the amount of spray.

Once you've done that, open up your pizza dough and tear off pieces. Place those torn pieces into your muffin pan. Now, I pressed down to at least cover the bottom a little bit. 

After you've used all of your dough, grab the pizza sauce and begin to scoop it onto the dough. I just used a spoonful of pizza sauce for each. 

Next, you'll take your cheese and grab a tad bit and sprinkle it on top. For my cheese I used the mild cheddar since I was trying to use ingredients that we already had instead of having to buy more. Once you put your cheese on top, sprinkle on some pepperonis. Now, you can even place some pepperonis onto the pizza sauce and then add your cheese... it's up to you!

After you've made each of your pizzas place the cupcake pan into the oven and bake for 10-15 minutes. Now, I baked it for about 17 minutes to ensure the middle was cooked. 

Once time's up, let them cool for a few minutes and enjoy. They're absolutely delicious and are still amazing the next day!


DIY Baby Mobile Part 1


Okay, so sadly my daughter will be 5 months old next week and we've barely finished her room! We've painted, added the crib, added a bookshelf, and the rocking chair (and we did that 2 months ago). It's been a slow process, but sometimes it just has to be. The only time we can honestly get anything done is during naps and bedtime. Which is fine with me, it may take forever, but hey, it's okay.

Anyways, I decided to make her mobile. Mostly because at this point in time we cannot afford a music mobile and none of them honestly match her decor. Plus, she also has a musical toy that she sleeps with and loves; so, there is no need for one.

Here's what I've done so far:

I grabbed some old and I mean old wooden needle point circles. I honestly can't remember what they're called! I'm using two, one small and one large.


Next, I grabbed my scissors and a roll of ribbon from the baby shower that we threw last year. Trying to reuse as much as possible.


Okay, here's the part where you kind of have to eyeball everything. In order to wrap around the ribbon with minimal pieces, I just unraveled as much ribbon as I could and cut it. On the larger one, I ran out right near the end. So, to remedy it I just taped the end to the wood and cut another piece and kept on.


Here are both completed. Now, of course you do see the fact that I still have the metal screws still showing. To remedy this I just grabbed some paint from my bucket and tried to match it to the ribbon as much as possible.


I would say that's a pretty close match!


I did put two coats of paint on the screws to avoid being able to see the gold. Once both of them dry I'll be able to add the rest. I can't wait! I'm hoping it turns out okay. 

Simple Mac & Cheese


Right after a major winter storm and a several day power outage we came home to some spoiled milk and a few other items. Even though our house was like an icebox and we never opened the fridge it still happened. Unfortunately, we live about 30 minutes from the nearest store; so, we have to make do until we go into town.

Well, last night I wanted some mac & cheese and figured I could make it without the milk. My husband kept contesting that fact. I tried anyways. Since my idea didn't work, we went with his. He suggested using evaporated milk. All I could think of was great this is going to taste really funky.

Ha! I was completely wrong!! It actually gave it a nice sweet taste.

You want to know how to make it, right? Well, here's what you need...

12 ounces of Velveeta Block Cheese (or any other brand, even name brand, your choice)
1/3 cup of Evaporated Milk
2 cups of Elbow Macaroni

Directions:

  1. I boiled the water at high and added the macaroni once it completely boiled
  2. Once the macaroni was done, I drained it and placed it back in the pot with the burner on medium.
  3. Now, I added the cheese 4 ounces at a time. This helped to melt it a little better.
  4. As the cheese began to melt, I added the 1/3 cup of evaporated milk. Continuously stirring until it had combined.
  5. Once it was all done we enjoyed it with a TON of leftovers! 
~*~ Also, it heats up very nicely in the microwave ~*~

Just a simple substitution with an item that we had lost and I must say it worked out very well. 


A Wrinkle in Our Plans


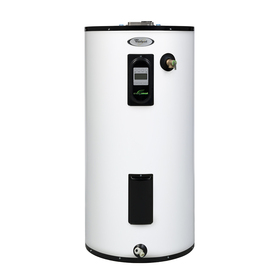
Whirlpool 40-Gallon 9-Year Regular Electric Water HeaterSo on Saturday night while I was trying to make cookies I noticed a creepy sound coming from underneath the house. I ignored it and kept on going. Well, the pan that I needed to bake the cookies was dirty so I went to turn on the water. Of course, we have no water. At that point I freaked mostly because I had just washed clothes and had water... not understanding what was going on. Once I stopped, I went over to the breaker box and turned the water pump off, waiting a few minutes and turned it back on... well the sound was beyond creepy and the floor shook.

I moved on to freaking out even more only because of baby E. I wanted to make sure she would be okay. I called my husband to ask him what he thought and after he got over the initial shock of it all... we put our heads together over the phone to figure it all out. Now, this is all happening at 10 pm at night. So, after several phone calls, several shut offs, several trips underneath the house; we had a few friends come over to check everything out.

Come to find out our water heater was spewing water everywhere and the pressure in our pressure tank had dropped. So, thankfully it wasn't anything dealing with our well cause we really would be screwed.

Anyways, after a night of no water and a day of fussing and frustrations we finally have water. Woohoo. We found out that it was just the hot water heater and the airbag in the pressure tank had deflated (that was an easy fix). There has even been a HUGE difference in our hot water (of course) and the pressure.

Okay... so, your probably wondering how this became a wrinkle in our plans. Well, the money that we had saved up for some new light fixtures and other items went towards our water heater. Plus my husband had to buy a fancy one instead of the one we had talked about. Which in a way is okay because it could have been worse and we can save that money back up. Hopefully the energy savings will be evident in the long run.


A Lifesaver For Us and Our Sick Baby ~ The Graco Nasal Aspirator


~*~ 
Let me just start off with the fact that I am not endorsed of affiliated with this company in any way, shape, or form. I'm just a real mama sharing what's worked for us and our baby girl.
~*~

So, after we found out that we had mold in our blue hospital nasal aspirator (and yes, we cleaned them constantly); I ended up freaking out and literally crying about it. It was the whole new mama thing and hoping that my baby girl was still okay. Anyways, I looked on-line for some other options and found the Graco Bebesounds Nasal Aspirator. We chose this aspirator not only because it was electric and would give us a better suction, but it was easy to clean and it had a musical option to soothe baby. Now, we did have to buy the extra replacement tips to the longer tip. However, it was a reasonable price; under $2.00, then I got it for about nothing with some babies r us coupons I had from my purchases. 

In the end, this has been the biggest life saver for us! Right in the middle of a nasty winter storm our baby started to get worse. She sounded horribly, coughing, sneezing, congested, a low grade fever, and a runny nose light a faucet. She had already had a rough night and so that we could be at ease and know she was at ease we packed up our stuff and headed out at the height of the storm. We drove down to our pediatrician to find out they were closed so we headed out to the pediatric ER. After hours of sitting there, we found out that she had an upper respiratory infection. We told to just monitor her and suck out the snot. 

As you can see below this thing has seriously worked! This has just been the past couple times today during her diaper changes so far. A LOT OF SNOT!


Now, I usually wash them out with warm soapy water after every 2-3 diaper changes and then a full clean in the dishwasher every 2 days when we wash her bottles. 

Here are a few places that you can buy them:

Walgreens ~ $19.97 (they don't sell the replacement tips)
WalMart ~ $19.87 (I haven't seen the replacement tips there)
Target ~ $19.89 (they don't sell the replacement tips)
Amazon ~ $19.87 (the replacement tips vary from $9.39-$17.00)
CVS ~ $19.99 (the replacement tips are $2.99)
Babies R Us ~ $29.99 (the replacement tips are $1.99)

The only thing I would say that I am disappointed in is the fact that it does say that it includes 2 tips (it only includes one) and has a carrying case (which there was none in the package). Otherwise despite those two downfalls it's been an absolutely amazing product and has seriously helped us with the baby E's snot faucet. She sounds so much better after each suction :).


Wednesday, March 20, 2013

OLD Home = New Slate


So, my husband and I bought a home about 4 months ago... our first home. This after a LONG 5 month ordeal with our Realtor and then the investment company that we bought our house from (it was a foreclosed home and they had ended up with it). In the end though we finally closed 2 weeks before Christmas. Which meant we could celebrate an actual Christmas... we hadn't celebrated Christmas together in over a year.

Now, it is an older home; almost as old as my husband and I. The day after we signed the closing documents... WE HAD TO MOVE IN! My husband's family took it upon themselves to take my husbands keys to our storage unit and house, rented a Uhaul, and picked up our items without our knowledge. OH, YES WE WERE LIVID. Especially, when we arrived at the house and our stuff was being thrown out of the truck and onto the wet ground. Oh, I about cried. As they were removing our items I began to take a few of our stuff and I noticed half of my stuff was either broken or damaged. Things were dropped onto our coffee table and dented, broken glass, broken dishes, etc. You name it, it was probably broken.

Anyways, once they left and we were left with the aftermath of boxes everywhere - we tried our best to organize and move to the rooms in which they belonged. We tried our best to organize this giant mess, but in the end we were to overwhelmed and just stopped. So, we ordered dinner and figured we'd deal with it later.

Skip a few months and here we are... boxes still everywhere and only one room finished... our daughters room, well somewhat. For my husband and myself we're dreamers and before any other room can fully be finished we want to get a few things done to make this home our own. Bringing some life to this once beautiful home. Therefore, we're saving up to redo this entire home.

So, here's our plan:

  1. Living Room
    1. paint the trim/walls
    2. add tile to the fireplace and paint
    3. replace the fan
    4. add some decor
  2. Hallway
    1. paint trim/walls
    2. add some decor
  3. First Bedroom
    1. GET THE BOXES OUT!
    2. Then who knows :)
  4. Second Bedroom
    1. add hamper
    2. add trashcan
    3. add pictures
    4. organize closet
  5. Master Bedroom
    1. replace fan
    2. paint walls/trim
    3. add decor
  6. Hall Bathroom
    1. desperately need new shower curtain
    2. replace floor
    3. fix walls
    4. paint walls/doors
    5. caulk tub
    6. replace ceiling fan and lighting fixture
  7. Master Bathroom
    1. add wainscoting 
    2. paint walls/trim
    3. replace floor
    4. caulk tub
    5. add framing around mirror
  8. Closets
    1. add dressers and shelving
    2. repaint
  9. Office
    1. add desk
    2. add decor
    3. paint walls/trim
    4. add shelving
  10. Kitchen
    1. replace cabinets
    2. replace counter top
    3. add backsplash
    4. possibly replace appliances
    5. add blinds to bay window
    6. add seating underneath bay window
  11. Laundry Room
    1. add cabinets and shelves
    2. add doors to hide laundry
    3. add place to hang cleaning supplies
    4. paint walls/trim
  12. Dining Room
    1. add wainscoting
    2. paint walls/trim
    3. add decor
  13. Outside
    1. add wrap around porch
    2. privacy fence
    3. replace or maybe paint siding
    4. repaint porch and deck
    5. add grass
    6. paint shed
    7. hang pegboard inside the shed
    8. make a compost barrel
    9. make a rain barrel
    10. build a garden
    11. build a raised flower bed
    12. add storm doors
    13. replace doors
Now, this is just a list as of right now --- who knows it may just continue to grow. Plus, later down the road we'd like to add an addition to give us a few extra bedrooms. 


Welcome!

Hello Everyone! I've decided to join my two previous blogs together to just make one. With everything that's going on in our daily lives I figured just having one will make everything a little bit easier than always having to go back and forth. Therefore you will see several of the items from the two previous blogs as I transfer them onto here and make adjustments as necessary.